Colours I used for this are enamels:
Humbrol:
Khaki Matt 26
Radome Tan Matt 148
White Matt 34
Black Matt 33
Model Master:
Burnt Umber
Burnt Sienna
Vallejo rust streaks AK 013
Vallejo Dark Streaking Grime AK024
Tools:
Thin brush N°1
Flat brush N°3
Enamel thinner
Streaks:
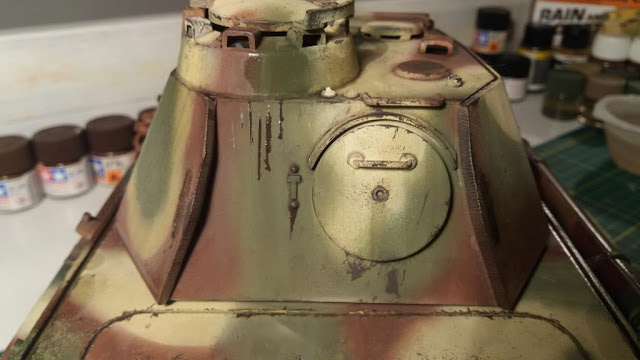
With a thin brush I'm taking some grime I made with Burnt Umber (dilution ratio of 60% paint and 40% Thinner), you can also use products like AK or Ammo streaking grime.
The most important is to use an enamel based product as we already applied enamels (or oils) on our model, any water based product won't react properly.
I'm drawing thin lines on the sides on the model, from top to bottom. The lines must have different size and length.
After 2 or 3 minutes, with a flat brush wetted in thinner for enamel I'm stumping the lines with vertical movements from top to bottom.
Don't overdo it or you will remove it completely.
You can repeat it various time or also vary the colours used until you are satisfied.
Like here in some areas I added some lines of khaki.
Here is the result, it have to be subtle.
We are not looking to get a Tiger stipes look!

Let it dry completely before going to the next step: Rain marks.
Rain marks:
Rain marks are due to the water or rain flowing down over the dust and mud.
I'm mixing light grey with buff (Radome tan works too) diluted with thinner.
Rain marks have to be drawn from bottom to top.
After few minutes, we start to blend them with vertical movements from bottom to top.
Again you must let it dry completely before the next step.
Rust streaks:
For the rust streaks, you can use specific products like AK Rust Streaks, or use enamel paints. In that case I'm using Burnt Sienna for the orange red tones and Burnt Umber for the darker tone.
First have a look at as much real rust streaks as possible. Also you have old and fresh rust streaks.
The streaks have to start also from some previously painted chips or rusty panel also painted before.
Of course depending of the operative situation of your model you must add more or less rust streaks. Some models like used on the Russian front with very hard weather conditions will means more rust streaks. On another hand, vehicle used in desert condition will not have the same kind of streaks.
Also the rust colour will vary from orange for fresh rust to deep brown for old rust.
!!VERY IMPORTANT!!
Two techniques are recommended, the first one is to blend the streaks with a flat brush wetted with thinner. With this technique the center of the streaks will loose intensity. I would recommend it as a pre streak.
For the second one, once the streak is done, with a thin (brush N°0), wetted (never flood it) with thinner I blend the streak first on one side, second on the other side. With this technique, the center of the streak keep it intensity.
Again let it dry before getting to the next step.


Aucun commentaire:
Enregistrer un commentaire